Monday, July 30, 2012

Birthday Garden

Here is another project I completed from my shopping spree today (see post).
I have a birthday poster but last year I found myself forgetting birthdays or not doing anything particularly fun for birthdays unless I remembered them. I wanted to make birthdays fun and with my new name "Mrs. Flowers" I thought what a better way to celebrate birthdays than to make a birthday garden to go near my birthday poster!
I purchased a pail from the dollar section at Target and added some letter stickers I had in my sticker box to spell out "Birthday Garden" (try to ignore the fact that the E of gardEn is actually an & symbol-I ran out of E's! I hate that problem with letter stickers!!)
I then used the new 10 pack of unisex star pencils from the dollar section at Target, the fake flowers purchased from Walmart, and my leftover teal duct tape to create....flowers for the birthday garden! (Use a wire cutter and not scissors to cut the flowers off their stems, then just attach with duct tape...make sure the sharp edges are covered)

Now, when it is your birthday, step right up and pick a flower from the garden to keep. At the end of the year the garden will be empty but everyone will have a piece of the garden to keep at home! I think I am also going to give my students a book for their birthday as well, I am going to wrap all of them up so it is a surprise, the Dollar Tree had a lot of nice books I saw today)

Happy Birthday!


Star Boards

I love all of the cute bulletin board displays that teachers put up or the cute borders and sets I see in the store but I hate putting the time and effort into changing displays just to show off student work. I wanted a more permanent way to display student work that I could change as often as I would like. It is so important to display the student's work for their motivation, so people can see what types of work you are doing in your classroom and for FUN!
I used the wooden clipboards I purchased from Walmart (cheaper than at Target, less than $2/piece), the duct tape in fun colors (a set) that I purchased at Target (around $5.00 for two colors and thinner rolls), and the super student star badge stickers I purchased from Walmart to make a "Star Board" display for student work. I will hang these clipboards onto the wall and add the student's name onto their clipboard. Now, I can easily add that student's best work of the day up on their Star Board for everyone to see! I can change this as often as I want and it will last all year. It looks neat and I bet the kids will be excited to have their own Star Board.
Here is the step-by-step. I will add the student's name in the teal duct tape line along the bottom. The Super Student star badge stickers are just for fun when the board is empty it will still look very nice and make the kids feel great about the work they are going to put on their Star Board! The one package of Scotch Duct Tape had both of the colors included (see Shopping Spree post and you can see what the package looks like) and those two rolls were just enough to complete the project (almost ran out of Star print but made all 8 with it!) Had some teal leftover (which I used-wait till next post!). 

Here are all 8 completed boards side by side. I think they look great and it will make a great display! I will keep them up all year round and add work to it daily/weekly/per unit. I think you could also use these boards for other various purposes: behavior management, to do daily work with, etc. It makes an ordinary clipboard very fun! 

Shopping Spree!

I went on a shopping spree today for back to school materials. I went to the Dollar Tree, Target and Walmart...here are the pics:
Dollar Tree, spent $15.00
4 sheets of 50 laser stickers, 1 sheet of tattoos, 2 bingo dabbers, 1 number puzzle, 2 abc and number foam puzzles, ID badge, 2 lace-ups, and 2 shape and color poster sets

Target, spent $11.00
2 cute Crayola number and color books, 2 wide puzzles (number and alphabet, big pieces), 10 pack pencils, 1 pail and Scotch duct tape in colors (this was the most expensive item at $5.00)-most of the things are from the dollar section

Walmart, spent $35.00 
10 pencil bins (5 pink, 5 blue, not sure how many boys/girls I will have and there weren't enough in one color- they were like 50 cents a piece!), apple decals, super student star badge stickers, 3 poster sets (colors, numbers and shapes-88 cents/piece!!!), 2 sets of fake flowers, 1 mini muffin pan (this is actually not for the classroom but I wanted you to see what all I got for the price), 1 five-star notebook with folders, 8 wooden clipboards (less than $2/piece).

You will see what I am up to with some of these materials in future posts :-) 

Saturday, July 21, 2012

Felt Stories

I love felt boards and I only used one during student teaching. I decided that I missed it and wanted one for next year! I went to Lakeshore's back to school sale and purchased this felt board (not in the sale but I used my coupon I got in the mail to get 20% off)
Now this one is kind of small, but I think it's a good size. You won't be able to put a ton of pieces on there- you'll have to tell the story part by part but you can lean it up against an easel or it has its own feet on the back to stand up (which it is doing in this picture on the floor).
Then, I went over to the bulletin board packages aisle and bought the Eric Carle Very Hungry Caterpillar set. It's a pretty big set and this was included in the 20% off sale. The images were perforated so I took them all out and laminated them (I cut some of them too-for example, all the fruit he eats are on one image like 3 plums together, I cut them all out separately and laminated them separately). I used my hot glue gun to attach the laminated images onto felt sheets and then cut those out so they would stick to the felt board. I love my new story! I know you can purchase these sets, but it was fun and easy to make and I like to think I saved some $.


Laminated

Attached to felt sheets

And Jazzy approves!


Monday, July 9, 2012

Lesson Plan Book

I am in the process of creating an awesome lesson plan book!

I bought this planner that was kind of expensive...can't remember how much at Walmart. It is a daily book so each day has it's own page-which I thought would be perfect for lesson planning! I added a label holder that is sticky to the front and made my own label for the book (I can take it out and change the insert in case I decide I don't like the pattern anymore)


This is just the beginning...I haven't decided how I am going to organize it yet. An idea I have is to use post-it notes to block of chunks of time-color coded based on subject or special-but I will need more information like specials and everything once the school year starts-I will keep you updated!

Comments/suggestions? What works well for your lesson planning?

Teacher Tool Box

This is also another post about something I found online and attempted to make...a teacher tool box! I headed over to Lowe's and bought a hardware supply container for $20. I hated that it was navy blue but that was the only color they had and I am an on the spot shopper so I didn't want to go looking around at other stores because I was too excited to start this project.
So I filled it with numerous supplies. I started with the top part being student-centered tools and the bottom part being my tools. Then the big drawers in the bottom were saved for bigger things. 

The things I have in there are: eraser caps, pencil grips, erasers, sharpeners, jumbo rubber bands, rubber bands, safety pins, brads, writable tabs, push pins, binder clips, rings, paper clips, colored paper clips, big paper clips, jumbo paper clips, post its, dot stickers, labels, staples, index cards and wite-out.

One complaint-the big drawers were not deep enough to hold pencils and pens :-( that made me really sad to find out-oh well, I will keep them in cups on my desk like I did last year.

So..here is the finished product! There are still empty drawers and some labeling to do-


As you can see- I took the navy blue and made it cute...the silver stickers don't show up well on the camera but you can read them in person. I used my label maker for the small drawers to keep it neat and consistent, but I hated when they were uneven and it may still drive me nuts...it's hard to do!

This will make my desk so much neater and organized, instead of having all those little things clumped together in a drawer. I don't have a big desk next year either so I wanted to make sure that I did this! Let me know what you think!


Thursday, July 5, 2012

Fun Post :-)

Here is a great way to organize construction paper-I saw the idea online. I bought a file folder container at Walmart and put in hanging file folders. I organized by color and have a folder at the end for scraps that were still reusable.
It's great to not have to dig through a huge pile-plus if you are only using one color you can just remove the whole folder from the bin!

Also, I was recently in San Francisco and saw this at Pier 39-thought I would share with fellow teachers :-)


IEP Bins and Data Collection

I really, really, really love data. It helps me to know that I am truly hitting my student's goals and objectives as well as understanding where the problems may arise and how to modify the way I am instructing. That being said, I would love to do more data and keep working with different things to find easy and effective ways to track and review data.

I have always like the IEP bin idea where you keep data on all students goals and objectives and have bins with work that pertains to each of the objectives in it. It is a great way to quickly assess and makes for an easy hour or so out of the day of personalized instruction. It also came in handy during IEP progress report time because I would have specific data points to list.

This is what I used this past year and it worked well, however, there were some downfalls to the system. I didn't keep up with it as much as I wanted to during stressful times, such as alternative assessment and right before holiday breaks. Also, it was hard for a lot of my students to complete tasks independently, so I found myself working with the same students over and over while the select few always worked independently on a task because they could. Finally, reviewing the data was time consuming and I have to admit, I didn't keep up with it as well as I should have.

Here is an example of a student's IEP Bin. I got the bins at The Container Store for less than $4.00/each. This student was one of my third graders with goals including coins, coloring in the lines, identifying letters in random order, matching lowercase letters, identifying positional concepts, counting when given a number, etc. 

Each group had a binder. I grouped just in pairs (small class size) of student's with similar goals. I had one student who was significantly higher and one student who was significantly lower so they had their own programs. Inside the binders were data sheets for every single objective for the student's IEP.

Here is an example of a data sheet. I know it is hard to see. At the top it says what goal # it is. On the top row is where you would put the date. Along the left side is each objective, separated by the line going across. I tried to make each one as simple as possible, mostly using + and - for each data point. Each objective needed thought on how I was going to keep data on it, it wasn't easy trying to keep it uniform. As you can see, I would stop taking data once the student was struggling (at the bottom they were only counting to 30 or less so we wouldn't continue). Before each data sheet, I would have a copy of that IEP goal page so that anyone doing this work would understand what the goal was before taking data on it (the instructional assistants would do this with a group while I was working with a group as well, or substitute teachers could easily work on this). In the back of the binder I would keep old data sheets as they would fill up as a record. I tried to review the data weekly or bi-weekly. It was an easy way to see what objectives you weren't hitting each week!

This was just simply a set aside time (IEP Time) where I would see the progress on their goals. I would not use the binders during regular instruction to take data on goals because it would be too confusing and time consuming. However, I would try to note their progress during lessons elsewhere. 

Please leave any suggestions you have on this system, if you use one yourself and how yours is different!


Positive Behavior Management System

This is an idea that I used and tweaked, many times, during my first year of teaching. Next year, I will have new students and will most likely need to adjust my behavior plan, but I wanted to share this idea because it worked well, was easy and efficient and paired nicely with daily parent communication. It was also a great way to have permanent data on each child's behavior (and absences!) for each day.

The Smiley Face System :-)

First of all, each behavior management system has to be consistent with the classroom rules and the classroom rules must be posted along with consequences and rewards for following the expectations. I also must preface that I teach special needs students who are young, so my behavior management system is very basic, simple, easy to follow and understand. Obviously, this system can be modified to work with different types of students (older students you may use something other than smiley faces and X's, for higher functioning students you may not need to be so simple as to what behavior you need to see but can have a vague rule such as "treat people with respect", reinforcers can be different, etc).

Here were my classroom rules, rewards and consequences. The rules were simple, and the icons were attached by velcro because sometimes I needed to take a rule off and set it next to a student so they could see it and focus on it.
1) Hands and feet to self
2) Sit down
3) Listen to adults using eyes and ears
4) Quiet mouth and raise your hand

-Rewards: if you earned all smileys you could earn prize box (small things, stickers, erasers, temp. tattoo) at the end of the day

-If you earned most of your smileys you could earn free choice at the end of the day ("most" would be determined daily based on the schedule...I would number the schedule (usually 8 activities, including lunch and specials, and then I would pick the number to earn...easier at certain times like at the beginning of the year when they don't know the expectations as well and after breaks, but harder towards the end of the year..like 6/8 smileys is most of your smileys for the day)

Here is an example of determining the "most" smileys out of the day. This was on the board each day so the student knows what activities we are doing and how many smileys they need to earn.


-If you earned most of your smileys all week you got treasure bin on Friday (bigger things, dollar prizes from target, a sheet of stickers, pens and pencils, small oriental trader toys, etc)

-If you got most X (did not meet the "most" smileys requirement of the day) you did not earn free choice

-If you got all X's you loose a privilege from an activity or determined by teacher (this was usually a case-by-case basis because to get all X's is hard to do with all the opportunity to earn)

We would review the rules, consequences and rewards usually daily in our circle time, especially after breaks and less as they understood them well. When enforcing this system, I would also usually allow a "warning" before giving an X for an activity so the students could really work on changing the negative behavior into the positive behavior instead of just getting an X.
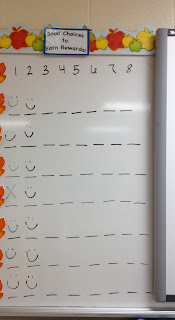
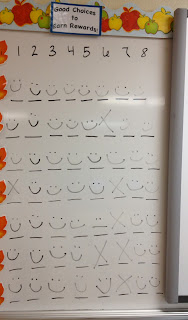
Here is how I would keep track of it. The numbers on the top correspond with the numbers on the schedule which are the activities of the day. I cut out the student's names, but they are on the left. This plan worked well because there were so many opportunities for the student to be successful and change their behavior around that it wasn't too discouraging to get an X. Also, it kept track of behavior the entire day, making it easier to know when the student was not successful and why. Also, it was student driven-after each activity we would transition back to our seats and I would ask "Who earned a smiley face?" and usually all of them would raise their hands and I would have to ask the student who earned an X why they earned it, etc. Sometimes, I would give X's in the middle of the activity so the student knew that they were not behaving appropriately (after a verbal warning) and if the student was physically violent they would get an X right away, no questions asked, and were usually removed from the group for safety.

At the end of the day, this made a clear and easy way to determine rewards. My parent communication notebook mimicked this board. 
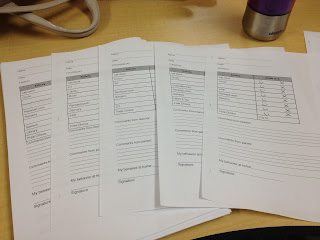
Each child would have a folder that had the little insert in the middle for hole punched papers. I had pre-printed the sheets to go in for each day of the week. The lines say Name: Date: and then have a chart of each activity and a :-) or an X. I would go through and circle what the student earned for each activity. They were customizable because there were blanks in the sections that were not the same each week so I can say exactly what activity we were working on. There were lined sections at the end of each page for comments from teacher and comments from parents and a signature line. I would refill them every Monday morning and keep their old sheets in a file folder in my desk in case I needed a record or to review their behavior to look for patterns. I would also record absences on there if they were absent (obviously would have to record that when they come back to school because their folder stayed in their backpack every night).

Some ideas of how I want to make this better:

So, since I have used this almost an entire school year some ideas for making it better are to bound the parent communication sheets into an entire book for the students to keep in their backpacks. This would cut down on time of putting in new sheets each Monday and would cut down on having to run and make copies quickly of the days that I ran out of. It would also help to keep parents on track with the school schedule because I would separate it by months, including sheets at the beginning of each month stating days we have off of school and not putting in a sheet for that day. I think this would save time and paper. Also, then I wouldn't have to file them away each week and it would make a great data collection from the entire year to look at patterns. Maybe even a graph of behavior at the end of each month would be a cool way to represent the data.

I would like the smileys and X's to be right next to the schedule. This was hard the way my board was set up last year but I was thinking maybe a pocket chart where each activity could be listed as an icon on the top and then the names would be on the left going down and for each one they get either a smiley or an X card. 

At the end of the week it was a burden to have to look through each student's folder to see if they earned treasure bin or not...I attempted to solve this problem with little index cards that they would just get a mark with if they earned it but I got busy at the end of each day and didn't keep up with it...possibly with the new pocket chart idea there could be a way to keep track of what they got each day of the week. Like, if they got most :-) they were green and most X they were red and they have to have all greens to get treasure bin. It was easy to keep track of daily but weekly got to be a lot of guessing or looking back through each day.

I also enjoy using coins with a behavior management system and I haven't gotten to how I would change the smiley system to work with coins. I think it is an important skill to not only learn the value of coins, but understand the transaction between earning money and then turning it in to buy something you want. Often times, I find that students do not understand the exchange between money and the value of something they want...sometimes they think everything is free :-) 

Please leave your comments on this ! Thanks!!


Organizing Unit and Lessons

Monthly unit, lesson and holiday plan drawer organization

Using basic three drawer organization systems (purchased at Walmart for around $13/each), I organized in these categories: Basics, Back to School and Resources, September and October, November, December and January, February and March, April and May and Life Cycles.


In each box there are file folders that are labeled for the unit, lesson or holiday plans they contain. I keep all my models and copies of the work in there as well as ideas that I have for future plans. On the front of each folder, I added a post-it note with the dates in which each holiday occurs so that I can keep on top of when I want to do the unit to make sure I get it done before the holiday occurs!


This is the ring of index cards I will keep either in my desk or on a ring by the monthly drawers so that I can see what is in each bin without having to dig through each one to find what I am looking for. As you can see, each drawer has a card that has a list of each folder that is in that drawer. Also, as you can see on the April and May card, they are color coded so that if something is in another drawer that I might do during that time period, I can remember that it exists as well as find it easily. The example here is that I do Life Cycles a lot (butterfly life cycle, pumpkin life cycle, etc) and those can also be done during certain times of the year (April and May or September and October, etc) so I want to make sure that I remember the best time of the year to do them and what drawer I can find them in!


This past year, I noticed how disorganized my units and lesson plans were. I used to have them in a file cabinet arranged by subject, but no other organization in particular. It was hard and time consuming to find what I was looking for and there were so many things that I didn't need to hold on to! After doing some blogging myself, I found a great idea for organizing my units and lessons and decided to do it...it was organizing by month. I absolutely LOVE this idea because months have themes and holidays that I found would creep up on me so quickly and I wasn't prepared.

Brand New Blog!

Hello! My name is Mrs. Flowers and I am a brand new blogger as well as a brand new teacher. This coming school year, 2012-2013, will be my second year as a teacher. I want to share some ideas that I have come up with (or borrowed and made my own) because I love getting inspiration reading other teacher's blogs!